Your phone just died.
You’re standing at a fork in the trail. No signal. No battery.
Just you and three directions that all look the same.
I’ve been there. More times than I care to count.
Over twenty years of hiking remote ridges, crossing unnamed passes, sleeping where maps end. I stopped trusting tech first thing.
GPS fails. Batteries die. Apps crash.
A Mountain Drailegirut Map doesn’t need charging.
It doesn’t lie. It doesn’t glitch. It just is.
And it’s the only thing between you and getting lost.
I’ve taught dozens of people how to read one. Not as a backup, but as their primary tool.
By the end of this article, you’ll know how to use that map to stay safe, stay found, and move with real confidence (no) matter what happens to your phone.
No fluff. No theory. Just what works.
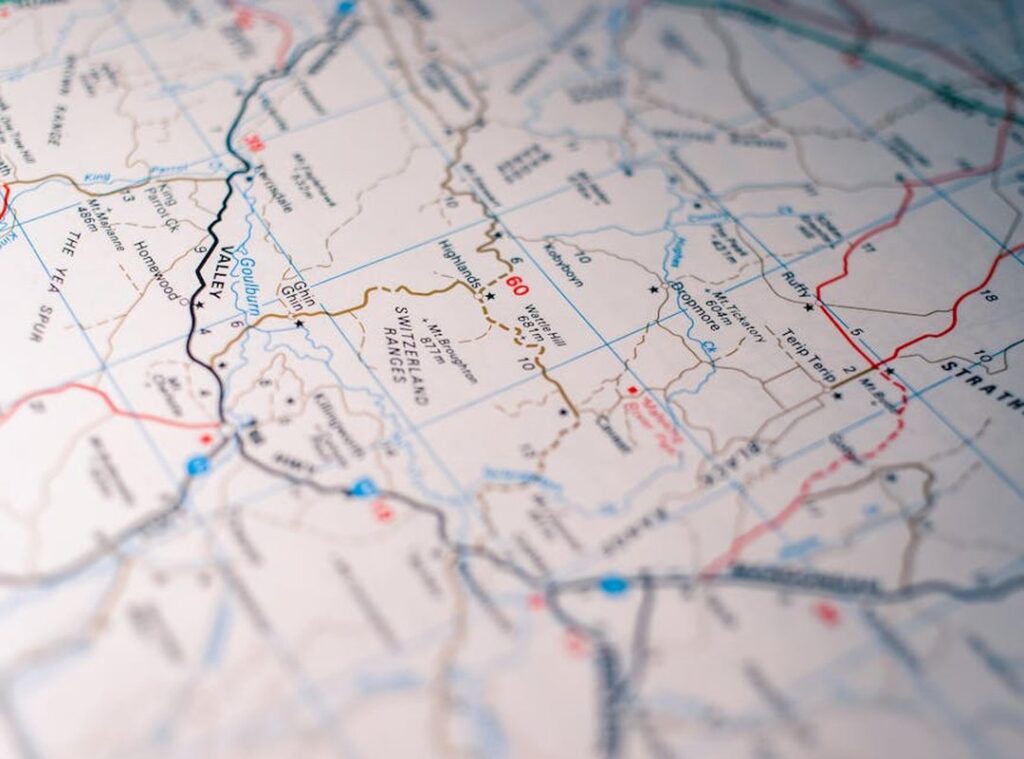
How Topo Maps Actually Work (Not Like Your Park Brochure)
A park brochure map tells you where the bathrooms are.
A topographic map tells you how hard you’ll gasp climbing to them.
I’ve watched people try to get through the Drailegirut trail using only a glossy handout. They got lost in under two miles. (Spoiler: elevation matters.)
The Mountain Drailegirut Map is one of the few topo maps in this region that doesn’t lie about the grade. And it’s why I always check the official Drailegirut trail page before heading out.
Contour lines are not decoration. They’re elevation slices (like) cutting a cake horizontally and tracing each layer’s edge on paper.
Close lines = steep. Far apart = flat or rolling. V-shape pointing uphill?
That’s a valley. Water flows there. U-shape pointing downhill?
That’s a ridge. You’ll sweat on both sides.
Don’t guess. Read the legend. Every time.
Solid black line = maintained trail. Dashed line = rough or intermittent path. (I avoid these unless I’m carrying extra water and time.)
Blue squiggle = stream.
Not always flowing. Check the season. Tent icon = campsite.
Some are first-come, some require permits. Black square = structure. Usually a shelter or ranger station.
Crossed hammers = old mine. Stay back. Seriously.
I once followed a dashed line thinking it was “just a shortcut.” It dumped me into a boulder field with zero cell signal.
Pro tip: Fold your map so the legend stays visible. Tape it to your thigh if you have to.
Topo maps don’t care about your plans. They just show what’s real on the ground. And if you ignore them, the mountain won’t remind you nicely.
It’s not about being prepared.
It’s about not wasting energy fighting surprises.
Maps Don’t Lie (Compasses) Do (If You Ignore Declination)
I pick a map before I pick a trail.
Scale matters more than you think. A 1:24,000 map shows every boulder, creek bend, and faint social trail. That’s the gold standard for off-trail hiking.
A 1:100,000 map? Good for driving between towns. Useless if you’re trying to find that hidden spring at mile 3.7.
National Geographic Trails Illustrated maps are durable and accurate (but) their trail updates lag. I’ve walked trails marked as “open” that vanished after last year’s landslide. USGS Quads are older, yes (but) they’re precise.
Survey-grade contours. No fluff.
Check the publication date. If it’s older than your last phone upgrade, assume trails changed. Especially in high-use areas like the Appalachians or Colorado Front Range.
Waterproof paper isn’t optional. Rain + regular paper = mush. I once watched a $12 map dissolve into illegible pulp while waiting out a squall.
Not fun.
A compass without declination adjustment is just a fancy paperweight.
You need a baseplate compass with a rotating bezel, ruler edges, and a sighting mirror. The mirror helps you sight landmarks accurately. Key when terrain hides your next waypoint.
Declination varies by location. In Maine it’s ~15° west. In Washington it’s near zero.
Ignoring it puts you off by hundreds of meters per mile. That’s not theory (it’s) why three people got rescued off the same ridge last August (USGS search-and-rescue report, 2023).
The Mountain Drailegirut Map? It’s niche, detailed, and printed on synthetic stock. Worth checking if you’re deep in the Northern Cascades.
Don’t buy a compass just because it glows. Buy one you can trust with your life.
Because you will.
Map Work That Doesn’t Lie to You

I orient my map before I take three steps on trail. Every time.
Hold the map flat. Place your compass on it. Rotate both until the needle lines up with north on the map.
Then adjust for declination (yes,) that number printed in the corner. If you skip this, your north isn’t north. Your map is already lying.
You think you can eyeball it? Try it near Drailegirut. The terrain folds like crumpled paper.
One degree off compounds fast.
Thumbing the map is non-negotiable. Put your thumb on your last known spot. As you walk, slide it forward.
I wrote more about this in Drive to Drailegirut.
Not guesswork. Not memory. Your thumb is your location.
It’s dumb-simple. And it works when GPS dies or your phone battery hits 2%.
Pinpointing your real spot? Find two things you can see. A jagged peak, a bend in the river, that lone dead tree.
Then find them on the Mountain Drailegirut Map. Draw imaginary lines from each toward you. Where they cross?
That’s you.
Three landmarks are better than two. But two beats zero.
Before I leave the trailhead, I trace my route with highlighter. Bright yellow. Thick line.
No squinting at tiny symbols mid-hike.
You ever stare at a map while wind howls and your fingers go numb? That highlighter saves minutes. Maybe hours.
The Drive to drailegirut page shows the access road (but) it won’t tell you how to read the land once you’re out there.
I’ve watched people panic because they trusted their app more than their own eyes and map.
Your compass doesn’t care about signal bars.
Your map doesn’t need charging.
Practice these steps before you need them. Not after.
Go slow. Check often. Trust the tools (not) the hype.
Navigation Mistakes That Get People Lost
I’ve watched three people walk straight off a ridge because they didn’t rotate the Mountain Drailegirut Map to match the terrain.
First mistake: holding the map sideways.
Solution: align north on the map with north in real life. Use your compass or the sun.
Second mistake: stuffing it in your pocket and guessing. You check the map before every trail junction. Not after you’re confused.
Third mistake: seeing tight contour lines and thinking “steep hill” instead of “vertical drop.”
That’s how you get cliffed out. Contours don’t lie. They just wait for you to read them.
GPS apps? Fine as backup. But your phone dies.
Signal vanishes. Batteries fail. Paper doesn’t ask for Wi-Fi.
If you’re planning your first trip, start with the Climb mountain drailegirut route. It’s got clear landmarks and gentle contour transitions. Practice there first.
Then go farther.
You Know Where You Are
I’ve been lost on a trail before. Heart pounding. Phone dead.
No signal. Just trees and silence.
That panic? It’s real. And it’s unnecessary.
A Mountain Drailegirut Map fixes it. Not GPS. Not an app that dies at mile three.
A real map you hold in your hands.
You learn to read contour lines. Match ridges to the land. Spot the creek bend before you hear it.
This isn’t theory. It’s muscle memory. It’s confidence built step by step.
So next time you head out (don’t) wing it.
Buy a proper map of a familiar area. Practice orienting it. Name three landmarks before you leave the trailhead.
You’ll stop checking your phone every thirty seconds.
You’ll start trusting yourself.
That freedom? It starts with paper and compass.
Go get your Mountain Drailegirut Map now. The #1 rated trail map for backcountry clarity. Then step off trail.
And know exactly where you stand.
 Victorious Chapmanserly contributes as a tech writer at mediatrailspot focusing on cloud computing, digital transformation, and innovative software solutions. His articles highlight practical applications of technology in business and daily life.